The Complete Lip Filler Healing Process Day by Day Timeline in 2026
Healing varies widely based on your individual anatomy, the specific type of filler used, your injector’s technique, and the volume injected (for instance, the swelling from a full 1.0 ml syringe will be far more intense than half a syringe of lip filler).
Use this detailed, day-by-day medical timeline as your practical recovery checklist.
Day 1: The Immediate Aftermath & Inflammation

The first 24 hours mark the beginning of your body’s natural inflammatory cascade. When the needle punctures the highly vascular tissue of your lips, it causes microscopic trauma. Furthermore, modern lip fillers are made of Hyaluronic Acid, a hydrophilic (water-loving) substance that immediately acts like a sponge, pulling water into the area.
As the topical numbing cream or Lidocaine (mixed into the filler) wears off, your lips will throb, feel hot, and look significantly larger than you intended. Do not panic; this is not your final result.
- What to Do: Apply a cold compress (wrapped in a clean cloth) in 10-minute intervals to encourage vasoconstriction (shrinking of blood vessels), which limits bruising. Sleep on your back with your head elevated on an extra pillow to prevent overnight fluid accumulation. If you are unsure about nighttime positioning, check our specific guide on how to sleep after lip filler.
- What to Avoid: Do not consume alcohol, avoid strenuous exercise, do not use straws, and absolutely do not massage your lips. Avoid blood-thinning NSAIDs like Aspirin or Ibuprofen; stick to Tylenol (Acetaminophen) if you need pain relief.
Days 2 to 3: The Peak Swelling Phase

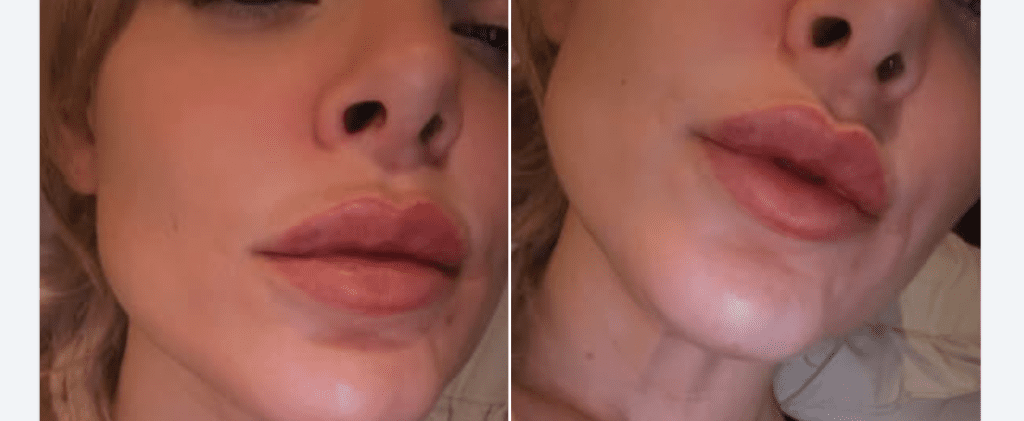
Brace yourself: Days two and three are generally the most intense stages of the healing process. When you wake up on Day 2, morning puffiness will be severe because lymphatic fluid settles in your face overnight while lying flat.
Your lips may feel incredibly tight, stretched, and hard to the touch. The left and right sides might look uneven. If you are prone to bruising, it will appear as dark blue or purple patches around the injection sites.
- What to Do: Hydration is key—drink plenty of water. You can apply topical Arnica Montana gel or take Bromelain supplements (pineapple extract) to help your body clear the bruising faster.
- What to Avoid: Avoid high-heat environments like saunas, steam rooms, or hot showers, as heat dilates blood vessels and worsens swelling. Cut back on salty foods, which trigger sodium-induced water retention.
Days 4 to 5: The Turning Point
By day four, you can finally breathe a sigh of relief. The extreme tightness will begin to recede, and your lips will feel noticeably softer. Your body’s immune cells (specifically macrophages) are actively working to clean up the trapped blood from your bruises. Because of this natural biological cleanup, you will notice your purple bruises turning into a faint green or yellowish hue.
- What to Do: You can cautiously return to your normal daily routines and light-to-moderate exercise. Taking daily progress photos is highly recommended to track your objective improvement.
- What to Avoid: Do not rush back to the clinic demanding that your injector dissolve the filler. Your lips are still in transition, and judging the shape right now is premature.
Days 6 to 7: The One-Week Milestone
Congratulations, you have made it through the hardest part! At the one-week mark, roughly 50% to 70% of the inflammatory swelling has completely vanished. Any remaining bruises are usually just faint, easily concealable yellow shadows.
Your lips will start looking like they belong on your face again, taking on a more natural contour rather than a swollen “duck lip” appearance.
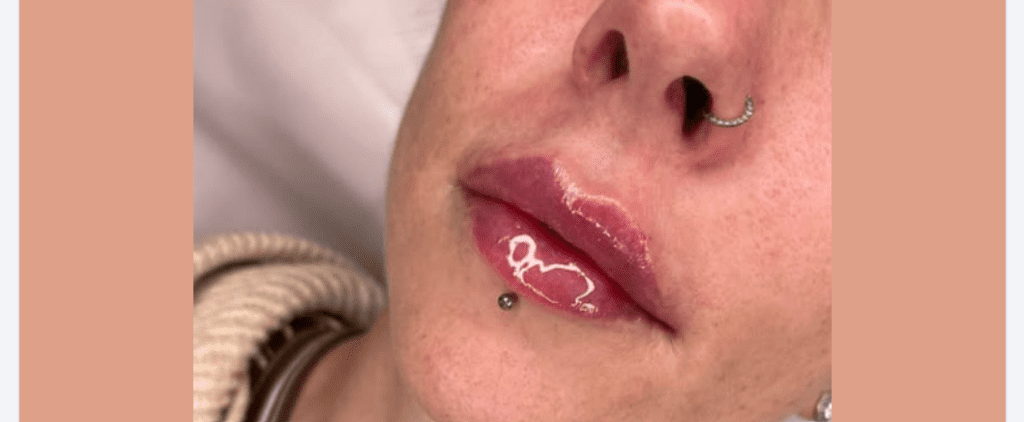
- What to Do: You can safely resume wearing lip gloss, lipstick, and makeup. Just ensure your makeup brushes and applicators are clean to avoid introducing bacteria to the healing skin.
Weeks 2 to 4: Tissue Integration & Final Assessment Window

During the second and third weeks, the “settling” magic happens. The hyaluronic acid filler gels beautifully with your natural tissue, stopping feeling like a foreign implant and starting to move naturally when you smile, eat, or speak.
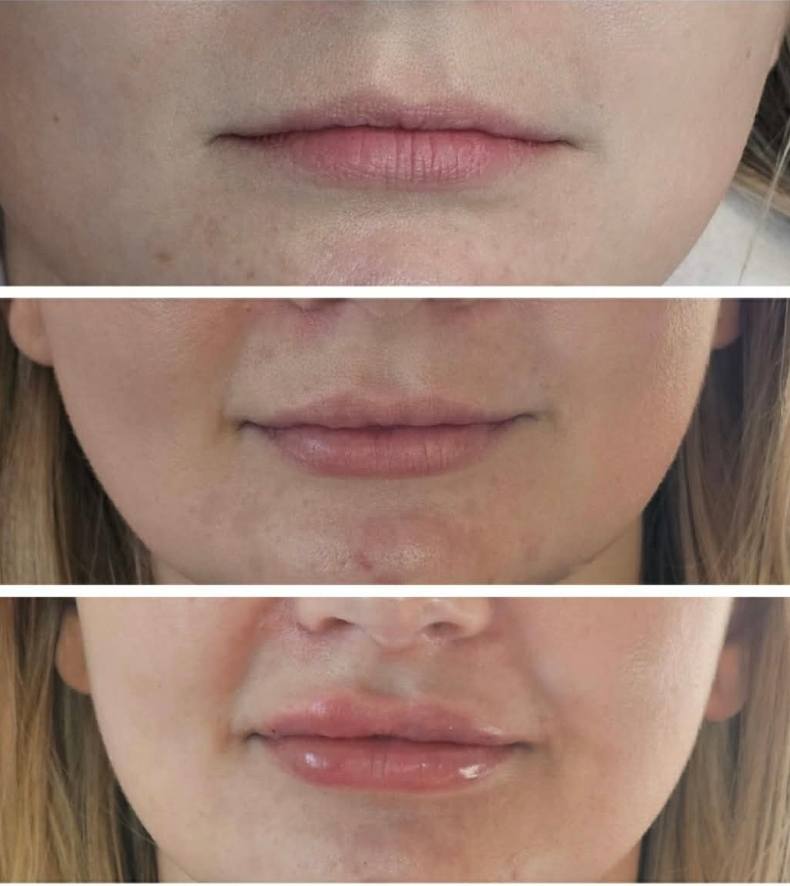
By Day 14 to Day 30, the healing process is officially complete. Minor asymmetries have resolved, and tiny bumps have smoothed out. This is the stage where you can finally compare your true lip filler before and after results. If you feel you need a touch-up or want to add slightly more volume for your desired look, the two-week mark is the earliest safe window to return to your aesthetic injector.
Lip fillers are one of the fastest-growing non-surgical cosmetic treatments worldwide, yet the recovery period still catches many first-time patients completely off guard. You leave the clinic, the numbing wears off, and suddenly your lips look alarming, bruised, and nothing like what you expected. Within 48 hours, many patients are already searching online in a panic, asking, “Has something gone terribly wrong?”
The candid and honest answer is: Probably not. The dramatic, asymmetrical, and oversized lips you see in the mirror are just going through the normal stages of edema (swelling) and tissue trauma. The terrifying “botched” photos circulating online are usually just normal swelling photographed too early in the healing timeline.
To protect your peace of mind and avoid rushing to book a dissolving appointment, you need to understand exactly how dermal fillers settle into your tissue.
How Long Do Lip Fillers Take to Heal?
If you are currently panicking about your lips, here is the direct answer to what you can expect during the typical lip filler healing process:
- Day 1 (Injection Day): Immediate swelling begins. Lips feel tender, tight, and potentially asymmetrical. Small puncture marks may bleed slightly.
- Days 2–3 (Peak Swelling): This is when swelling and inflammation reach their absolute maximum. Lips will look uncomfortably “over-filled” and firm. Dark purple bruising is most prominent.
- Days 4–5 (The Turnaround): Swelling actively begins to reduce. Bruises may shift in color to green or yellow as the body absorbs them.
- Days 6–7 (Improved Appearance): Up to 70% of the swelling is gone. The true shape begins to emerge, and lips feel significantly softer.
- Weeks 2–4 (Final Results): The Hyaluronic Acid (HA) filler fully integrates into your natural lip tissue. Residual lumps smooth out, and the final, settled result is completely visible.
Why Swelling Happens After Lip Fillers (The Anatomy & Science) in 2026
Before diving into how to fix the swelling, it helps to understand what is biologically happening inside your lips during your appointment. Knowing the “why” often relieves the anxiety of the healing process.
The lips are one of the most highly vascular areas on the entire human face, meaning they possess an incredibly dense and delicate network of capillaries and blood vessels. When an aesthetic injector introduces a needle into this tissue, three distinct biological reactions occur that trigger Edema (medical swelling):
- Needle Trauma & The Inflammatory Cascade: The physical puncture of the needle—no matter how thin or how skilled the injector is—is recognized by your body as micro-trauma. Your immune system immediately sends blood, white blood cells, and fluid to the area to protect and heal it, causing instant puffiness.
- The Hydrophilic Nature of HA: Most modern dermal fillers are composed of Hyaluronic Acid (HA). If you are wondering about the safest lip filler in 2026, almost all top-tier FDA-approved brands rely on HA. HA is heavily hydrophilic, meaning it acts like a microscopic sponge, actively attracting and binding to water molecules in your tissue.
- Lidocaine Expansion: Most high-quality lip fillers are pre-mixed with Lidocaine (a local anesthetic) to minimize pain. The volume of the numbing agent itself adds temporary, localized puffiness that takes a few hours to dissipate.
Note: Swelling can also be localized. For example, enhancing the Cupid’s bow often causes more noticeable, targeted swelling right at the top center of the upper lip due to the specific injection technique required to create that sharp definition.
Key Healing & Care Tips: The Ultimate Pre and Post-Care Guide in 2026
Many patients focus entirely on aftercare, but top board-certified dermatologists agree that reducing your swelling actually starts 48 hours before you sit in the injector’s chair.
Pre-Care: How to Prevent Severe Swelling and Bruising
To minimize your downtime, strict preparation is essential:
- Stop Blood Thinners: Avoid NSAIDs (Non-Steroidal Anti-Inflammatory Drugs) like Aspirin, Ibuprofen (Advil/Motrin), and Aleve for at least 48 to 72 hours prior. These medications thin the blood and guarantee severe bruising.
- Pause Supplements: Halt the intake of Fish Oil, Vitamin E, Ginkgo Biloba, and Ginseng, as these also act as mild anticoagulants.
- Skip the Alcohol: Do not consume alcohol for 24 hours before your treatment. Alcohol causes vasodilation (widening of the blood vessels), making you far more prone to bleeding and swelling.
Post-Care: Accelerating the Healing Timeline
To help your lips settle into their final shape as quickly as possible, follow these strict aftercare protocols:
- Cold Therapy: Apply a cold compress or ice pack (wrapped in a clean cloth to prevent ice burns) for 10-15 minutes at a time during the first 24-48 hours.
- Smart Hydration: Drink plenty of water to help your body heal, but strictly avoid excessively salty or high-sodium foods, which force your body to retain unnecessary water.
- Avoid Irritants & Heat: Stay away from high temperatures (hot showers, saunas, hot yoga) and intense, sweat-inducing exercise for 48 hours.
- Keep it Clean (No Makeup): Avoid applying makeup, lip gloss, or lipstick for the first 24 hours to significantly reduce the risk of bacterial infection at the needle entry points.
Normal Reactions vs. Medical Complications (Red Flags) in 2026
Knowing the difference between a normal, albeit annoying, side effect and a genuine medical emergency is crucial for your safety. Normal reactions improve linearly day by day. Complications, on the other hand, escalate and feel worse over time.
Use this quick-reference table to assess your symptoms. (If you experience any red flags, contact your provider immediately).
| Symptom Category | Normal & Expected Symptoms (Will Resolve) | Emergency Red Flags (Seek Immediate Help) |
| Color & Skin Tone | Purple, blue, yellow, or green bruising. Minor redness around needle marks. | Blanching: White, pale, or grayish patches of skin that look drained of blood. |
| Pain Level | Mild to moderate tenderness when talking, eating, smiling, or pressing your lips. | Severe, excruciating, or escalating pain that does not respond to standard Tylenol. |
| Temperature | Lips feel slightly warm on Day 1 due to natural inflammation. | Skin feels unusually cold or completely numb in a localized patch after numbing wears off. |
| Texture & Lumps | Small, firm, painless bumps or minor asymmetry during the first 1-2 weeks. | Blisters, pustules, severe throbbing heat, or signs of active infection (pus). |
What is Vascular Occlusion?
The most severe red flag is a rare condition known as Vascular Compromise or Vascular Occlusion. This occurs if the dermal filler accidentally enters and blocks a major blood vessel, cutting off oxygen to the tissue. Symptoms include extreme pain and “blanching” (white patches). This requires an immediate injection of an enzyme called Hyaluronidase to dissolve the filler and restore healthy blood flow before tissue necrosis (death) occurs.
How Injection Volume Affects Your Recovery Time (0.5 ml vs 1.0 ml)
One of the most common questions patients ask is, “Does the amount of filler I get change how long I stay swollen?” The answer is a resounding yes. The severity and duration of your swelling are directly correlated to the volume of Hyaluronic Acid injected into your tissue.
Here is how different volumes impact your day-by-day healing:
- 0.5 ml (Half a Syringe): A half syringe is typically used for a subtle hydration boost or minor asymmetry correction. Because there is less product (less HA to attract water molecules) and fewer needle punctures, the tissue trauma is minimal. Patients who opt for 0.5 ml often find their peak swelling is very manageable and they look “socially presentable” much faster—usually by Day 3 or 4.
- 1.0 ml (A Full Syringe): This is the industry standard for a noticeable, full-lip augmentation. Injecting a full milliliter causes pronounced tissue expansion. You will absolutely experience the classic “duck lip” swelling on Days 1 and 2. It will take the full 14 days for the product to seamlessly integrate and for the swelling to drop to zero.
- More than 1.0 ml: Board-certified injectors generally advise against injecting more than 1 ml in a single session to prevent vascular compromise and extreme, prolonged edema. If you want more volume, it is safer to build it over multiple sessions spaced a month apart.
Does the Injection Technique Change the Healing Process?
Beyond volume, how the filler is placed plays a massive role in your recovery timeline.
If you opted for a standard linear injection, the trauma is relatively straightforward. However, if you requested specific styles like the highly popular Russian lip fillers, your healing process will look a bit different.
The Russian technique involves injecting the product vertically (often called “tenting”) starting from the base of the lip and drawing outward toward the lip border. This requires significantly more needle passes and multiple entry points compared to traditional methods.
- The Result: You will experience more intense initial swelling, a higher likelihood of pinpoint bleeding, and potentially more bruising. However, this technique is unparalleled for creating height and a defined cupid’s bow without outward projection. For a deeper dive into which technique suits your facial anatomy, you can explore our comprehensive lip filler shape guide.
Navigating Lumps, Asymmetry, and Peeling Lips in 2026
During the two-week healing window, your lips will go through some awkward phases. Before you panic, here is how to handle the three most common aesthetic concerns during recovery:
1. Feeling Firm Bumps or Lumps
Small, firm nodules or lumps are incredibly common in the first two weeks. Usually, these are not permanent filler clumps; they are localized areas of swelling, minor internal bruising (hematomas) around an injection point, or simply the HA product gathering before it has fully integrated into the tissue.
- The Rule: Never massage these lumps yourself unless your medical provider explicitly instructs you to. Applying incorrect pressure can permanently displace the fresh, malleable filler. Let your body heal naturally.
2. Unevenness and Asymmetry
It is completely normal for your left and right lip to heal at different speeds. One side might look temporarily bigger, droopier, or more bruised than the other. This often happens because injectors might place slightly more product on one side to correct natural asymmetry, or you may have slept heavily on one side of your face.
- The Rule: Do not judge your lip symmetry until Day 14. If they are still uneven at your two-week follow-up, your injector can easily tweak them.
3. Dryness, Chapping, and Flaking
As your lips swell rapidly, the delicate skin stretches tightly. This stretching causes temporary micro-tears in the outer barrier, leading to extreme dryness and peeling around Day 3 or 4.
- The Rule: Do not pick at the peeling skin, as this can introduce bacteria. Keep your lips heavily coated in a plain, unscented hydrating ointment like Aquaphor or Vaseline. Avoid active skincare ingredients (like retinols or exfoliating acids) around the mouth area until fully healed.
Conclusion: Trust the Process
Navigating the lip filler healing process day by day requires patience and a strong understanding of your own anatomy. The “rollercoaster” of emotions—from excitement in the chair to sheer panic on Day 2—is a universally shared experience among cosmetic patients.
Remember, the dramatic swelling, the unevenness, and the dark purple bruising are all completely normal biological responses to tissue trauma. Protect your peace of mind by following strict pre-care and post-care protocols: avoid blood thinners, skip the intense gym sessions, utilize cold compresses, and above all, do not touch or massage your lips. By Day 14, the swelling will be a distant memory, and you will be left with the beautifully plump, hydrated, and natural-looking lips you originally asked for.
Official Medical References & Sources
To ensure the highest safety standards and medical accuracy, the protocols and anatomical information in this guide are backed by recognized government and medical authorities:
- U.S. Food and Drug Administration (FDA): Dermal Fillers (Soft Tissue Fillers) – Safety, Guidelines, and Approved Uses
- American Society of Plastic Surgeons (ASPS): Post-Operative Care, Risks, and Recovery Protocols for Dermal Fillers
- American Academy of Dermatology (AAD): Best Practices and Safety Guidelines for Dermal Fillers
Disclaimer: The information provided in this article is for educational and informational purposes only and does not constitute medical advice. The lip filler healing timeline varies from person to person. Always consult with a board-certified dermatologist, plastic surgeon, or licensed aesthetic injector before undergoing any cosmetic procedures. If you experience severe pain, blanching (white skin), or signs of vascular occlusion, seek emergency medical attention immediately.

Sarah Mitchell is a dedicated aesthetic researcher with over a decade of experience analyzing cosmetic procedures. Obsessed with data and safety, she helps patients to provide real words and navigate the world of lip fillers with verified before and after results and honest cost breakdowns.
Pingback: Migrated Lip Filler: 5 Signs, Causes & How to Fix It Fast - Lip Filler Results
Pingback: Half Syringe Lip Filler Before and After: 2026 Real Results, Cost & What to Expect - Lip Filler Results
Pingback: Lumps in Lips After Filler: 7 Causes, Massage Guide & When to Dissolve - Lip Filler Results
Pingback: Lip Flip and Filler Before and After (Real Results & Cost) - Lip Filler Results
Pingback: Can You Get Lip Filler While Pregnant? Risks, Rules & What If You Already Did - Lip Filler Results
Pingback: Purple Bruising After Lip Fillers: Purple, Blue, Green & Yellow Lip Healing Explained - Lip Filler Results
Pingback: Can I Use Vaseline After Lip Filler: Safe Aftercare Tips and Timing - Lip Filler Results
Pingback: Lip Filler Swelling Stages: Day-by-Day Timeline, Healing Process & Recovery Guide
Pingback: Can I Sleep on My Side After Lip Filler? The 2026 Expert Sleep Guide - Lip Filler Results