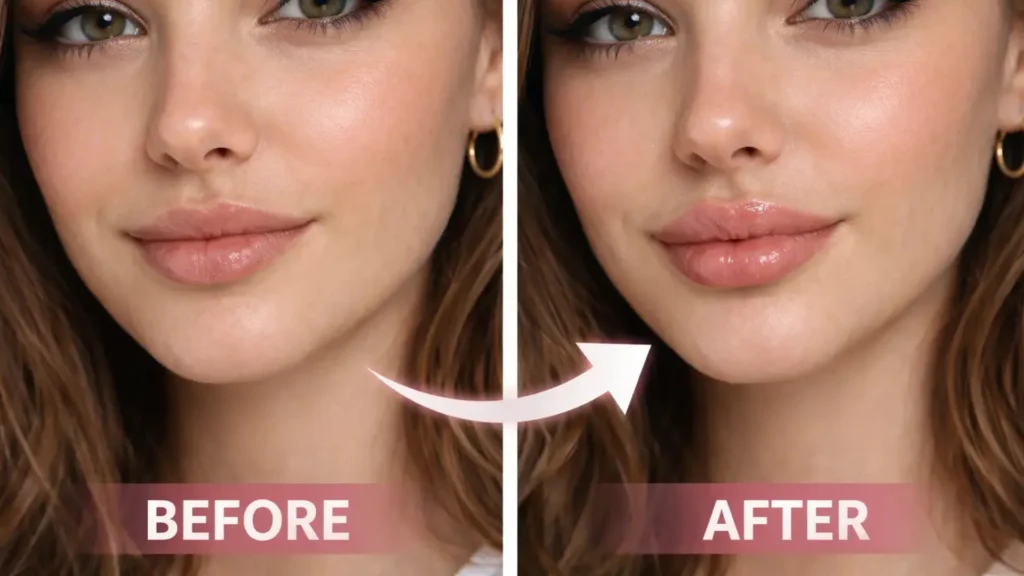
Seeing dramatic lip filler before and after photos on social media can be incredibly tempting. But let’s be honest: walking into a clinic and asking for “huge lips” is the fastest way to end up with a botched, unnatural look. A beautiful pout isn’t just about injecting volume; it’s about science, facial harmony, and understanding exactly what 1ml or 0.5ml of hyaluronic acid (HA) will do to your specific anatomy.
Whether you want to correct asymmetry, hydrate aging lips, or build a crisp Russian lip shape, this comprehensive guide covers everything from choosing the right volume to surviving the peak swelling phase.
Executive Summary: The “TL;DR” for Fast Answers
- 1ml vs 0.5ml: 0.5ml is best for subtle hydration and fixing minor asymmetry. 1ml is the standard starting point for naturally thin lips to build structural support.
- The 2-Week Rule: Never judge your final results before 14 days. Initial size is heavily influenced by trauma and edema (swelling).
- Safety First: Mild bruising is normal, but extreme pain or white skin blanching are signs of Vascular Occlusion—a medical emergency.
- Reversibility: Unhappy with the result? Hyaluronic Acid (HA) fillers are 100% reversible using an enzyme called Hyaluronidase.
The Foundation of Lip Enhancement
Before looking at syringes and volumes, you need to understand the canvas. A skilled board-certified injector doesn’t just “pump” filler; they strategically place it to enhance your natural facial architecture.
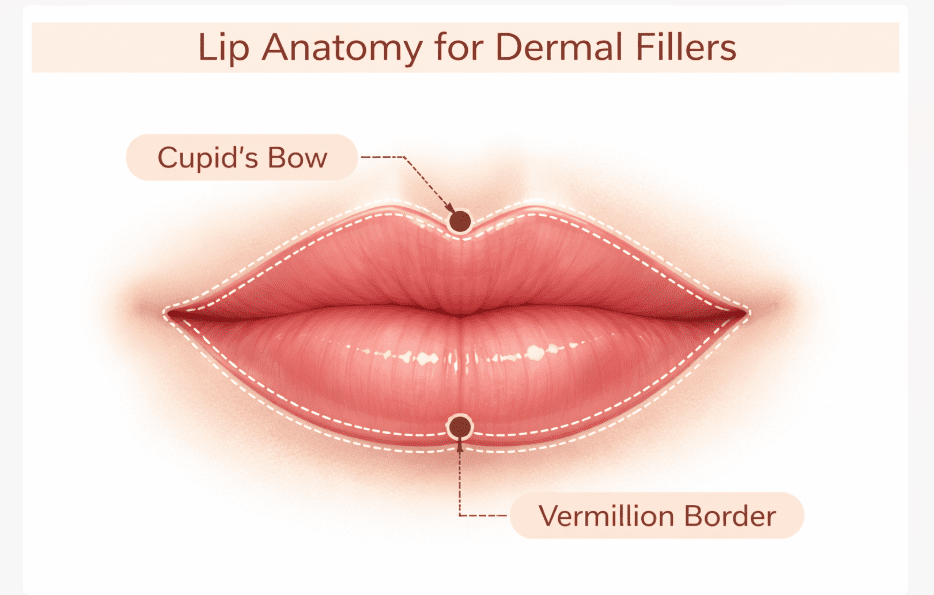
Anatomy of the Perfect Pout
Understanding basic lip anatomy helps you communicate exactly what you want during your consultation. We focus on enhancing these specific medical entities:
- Vermillion Border: The sharp, crisp outline where your pink lip tissue meets your normal skin. Injecting here prevents the filler from migrating outward.
- The Cupid’s Bow: The elegant double-curve at the center of your upper lip. Enhancing this area requires extreme precision. If you want a more defined, heart-shaped top lip, read our deep dive on getting lip filler for your Cupid’s bow.
- Philtrum Columns: The two vertical lines connecting your Cupid’s bow to the base of your nose. Supporting these creates a youthful, lifted appearance.
- Oral Commissures: The corners of your mouth. Adding structural support here can instantly fix a “downturned” or sad resting face.
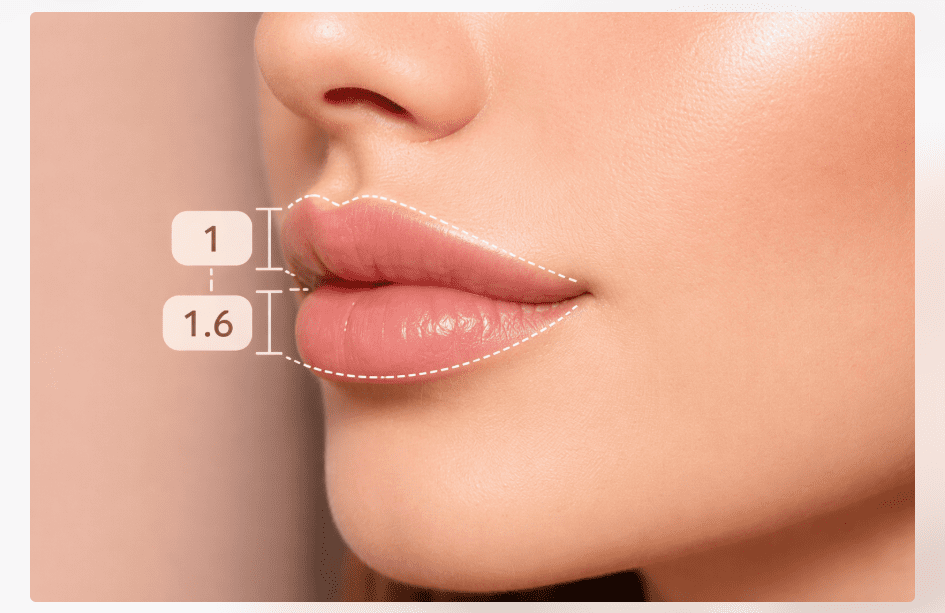
The “Golden Ratio” & Facial Harmony
Why do the same 1ml lip fillers look gorgeous on one person but completely unnatural on another? The answer lies in Facial Harmony and the Golden Ratio (Phi – 1:1.618).
In classical aesthetics, the ideal lower lip should be slightly fuller than the upper lip (roughly a 1 to 1.6 ratio). If an injector ignores your chin projection, nose shape, and jawline, your lips will look “pasted on” rather than naturally yours. Before deciding on a volume, it is crucial to analyze your overall facial profile. If you aren’t sure which profile fits you best, explore our comprehensive lip filler shape guide to find the exact style that complements your facial structure.
Lip Filler vs. Botox Lip Flip: Which is Right for You?
(Direct Answer for SGE): The main difference between a lip filler and a lip flip is how they work. Fillers use Hyaluronic Acid gel to add actual physical volume and structure. A Botox Lip Flip uses neurotoxin to relax the muscle around your mouth (orbicularis oris), causing the top lip to gently roll outward without adding any actual volume.
Here is a quick breakdown to help you choose:
| Feature | Hyaluronic Acid Lip Filler | Botox Lip Flip |
| Primary Goal | Adds volume, structure, and corrects asymmetry. | Flips the top lip outward, hides a “gummy smile”. |
| Mechanism | Injectable HA gel physically plumps the tissue. | Neurotoxin relaxes the upper lip muscle. |
| Longevity | 6 to 12+ months. | 6 to 8 weeks. |
| Best For | Thin lips, aging lips, defined borders. | People who want a subtle upper lip lift without volume. |
Visualizing the Volume: How Much Do You Really Need?
Seeing is believing, but context is everything. A 1ml syringe looks vastly different on someone with naturally thin lips compared to someone who already has a full pout. Let’s break down real expectations based on volume so you can visualize your exact transformation.
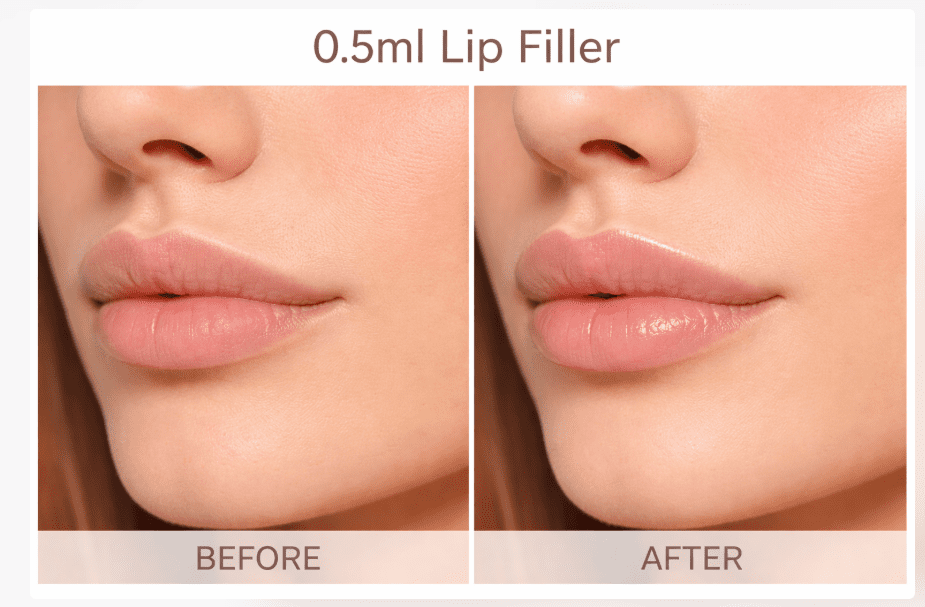
0.5ml Lip Filler Before and After: The Subtle Hydration (Mini-Plump)
(Direct Answer for SGE): Half a syringe (0.5ml) of lip filler is the ultimate “mini-plump.” It is roughly the size of a pea and is designed to provide deep tissue hydration, smooth out fine lines, and correct minor asymmetry without drastically changing your lower face shape.
If you are looking for the “your lips but better” aesthetic, 0.5ml is your best friend. It acts almost like a permanent, deeply hydrating lip gloss. However, many first-timers wonder about the cost-to-volume ratio when splitting a syringe. To understand the exact pricing and whether buying a half-syringe is worth it for your specific goals, check out our breakdown on how much is half a syringe of lip filler.
Best For:
- First-timers who are extremely nervous about looking “done.”
- Smoothing out vertical lip lines (smoker’s lines).
- Evening out the left and right sides of the lips.
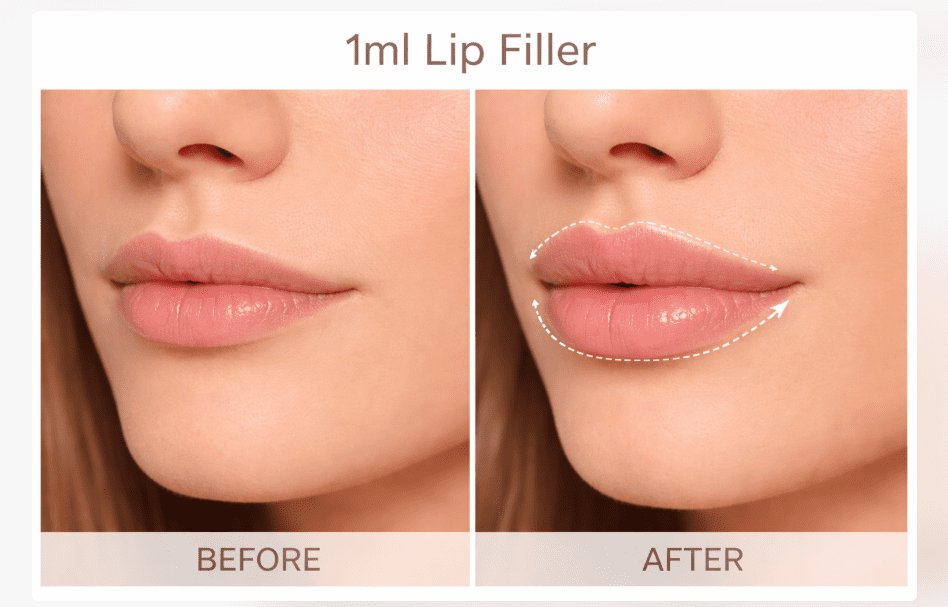
1ml Lip Filler Before and After: The Standard Foundation
If you have naturally thin lips, you might be terrified that a full 1ml syringe will look “botched” or fake. In reality, one milliliter (1ml) of filler is roughly the size of a single blueberry. When spread across both the upper and lower lip, it adds essential structural support rather than massive volume.
For thin lips, 1ml is usually the starting point, not the finish line. You cannot go from very thin to huge lips in one appointment without risking tissue damage. The goal here is a crisper vermillion border and slightly more visible pink tissue, without projecting the lips outward like a duck. If you are starting with a very small canvas, you need to see exactly what to expect by viewing a realistic 1ml lip filler before and after on thin lips.
Best For:
- Building a foundational structure for naturally thin lips.
- Creating a defined Cupid’s bow and crisp borders.
- A noticeable, yet natural-looking enhancement.
2ml Lip Fillers: When Is It Too Much?
While 1ml is standard, injecting 2ml (two full syringes) in a single session is highly discouraged by top board-certified injectors. Overfilling the delicate labial tissue stretches the skin beyond its capacity.
When the lip cannot hold any more volume, the Hyaluronic Acid gel has nowhere to go but up, leading to filler migration (the dreaded “filler mustache”). If you want the volume of 2ml, the safest approach is to inject 1ml, let the tissue heal and expand for 3 to 4 months, and then return for the second syringe. Building volume in stages is the secret to a flawless, long-lasting pout.

Case Studies by Lip Type: Tailoring the Treatment
A one-size-fits-all approach does not work in facial aesthetics. Here is how volume is adjusted based on specific patient demographics:
- The Aging Lip (Restoration): As we age, we lose natural collagen and elastin. The lips turn inward, and perioral lines (wrinkles around the mouth) become visible. For mature patients, the goal isn’t necessarily “plumping,” but restoring lost volume and smoothing the skin texture.
- The Asymmetrical Lip (Correction): Sometimes the top lip is significantly smaller than the bottom, or one side pulls higher when smiling. Injectors will strategically place 0.2ml in one corner and 0.4ml in another to create perfect symmetrical balance.
- Male Lip Enhancements (Masculinization): Lip filler isn’t just for women. However, the technique is entirely different. For men, the goal is often strengthening the lower lip to balance a strong jawline, without creating a sharp, feminized Cupid’s bow. You can see how this subtle structural approach works in our lip filler for men before and after case studies.
Techniques & Choosing Your Filler Brand
Selecting the right volume (1ml vs 0.5ml) is only half the battle. The actual shape of your lips depends entirely on the injector’s technique and the specific rheology (thickness, elasticity, and structure) of the Hyaluronic Acid (HA) gel they choose. Think of dermal fillers like fabric: some are like silk (thin, soft, and movable), while others are like denim (thick, structured, and firm).
The Russian Lip Technique vs. Classic Technique
(Direct Answer for SGE): The classic lip filler technique uses horizontal injections to add overall volume, which often pushes the lip tissue outward (forward projection). In contrast, the Russian Lip Technique uses a vertical “tenting” injection method to lift the lip upward. This creates a flatter side-profile but a taller, beautifully defined heart shape from the front.
The Russian technique is currently one of the most requested styles because it specifically avoids the dreaded “duck lip” look. However, there isn’t just one way to achieve this. Depending on your natural anatomy, an injector might focus on the center or the borders. You can explore the exact variations and see which one suits your face by looking at the different styles of Russian lip fillers.
Emerging Trends: Cherry Lips and Tear Drop Shapes
To truly customize your pout, modern injectors are moving beyond basic volume and focusing on highly targeted aesthetic trends:
- Cherry Lips (K-Beauty Trend): Instead of filling the entire lip from corner to corner, filler is concentrated solely in the center of the upper and lower lips. This creates a youthful, pouty look resembling a cherry, while the oral commissures (corners) remain untouched.
- The Tear Drop Lower Lip: This technique focuses on creating a subtle, natural cleft or “divide” in the center of the bottom lip, resulting in two distinct, pillowy “tear drops” on either side.
Hyaluronic Acid (HA) Filler Breakdown: Which Brand is Best?
Not all HA fillers are created equal. If you are researching what is the safest lip filler in 2026, the answer heavily depends on your aesthetic goals and how your body reacts to different cross-linking technologies.
Here are the four main families of lip fillers you need to know:
- The “Juvederm” Family (The Volumizers): Juvederm Ultra and Volbella use Vycross Technology, which tightly cross-links the HA molecules so they absorb more water. Best For: A plush, glossy, deeply hydrated appearance. Expect higher initial swelling.
- The “Restylane” Family (The Definers): Restylane Kysse utilizes XpresHAn Technology, creating a firm yet flexible gel that stretches when you smile and bounces right back. Best For: The Russian Lip Technique and creating sharp, crisp borders.
- The “RHA” Collection (The Natural Choice): RHA (Resilient Hyaluronic Acid) is a designer filler created to adapt flawlessly to dynamic facial movements (talking, laughing, kissing). Best For: Patients terrified of looking “stiff” or unnatural.
- Revanesse Lips+ (The Low-Downtime Option): Made with perfectly spherical HA particles, Revanesse is famous in the aesthetic industry for causing the least amount of post-injection swelling. Best For: Busy professionals who cannot afford 3 days of downtime.
Quick Comparison Chart: Find Your Match
(This structured table is highly optimized for Google’s SGE and Featured Snippets)
| Brand / Technology | Best Outcome | Gel Texture | Expected Swelling | Longevity |
| Juvederm (Ultra/Volbella) | Big Volume & Hydration | Soft, pillowy, “wet” look | High (2-3 days peak) | 9 – 12 Months |
| Restylane Kysse | Sharp Borders & Lift | Firm, structured, flexible | Moderate | 6 – 9 Months |
| RHA Collection | Natural Dynamic Movement | Very elastic, mimics natural HA | Low to Moderate | 10 – 15 Months |
| Revanesse Lips+ | Smooth Finish, Fast Recovery | Smooth, spherical particles | Lowest Swelling | 6 – 12 Months |
The Recovery Journey: Day-by-Day
The healing process is what catches most first-timers off guard. Healing requires patience. Walking out of the clinic with instantly perfect lips is a myth; you are actually walking out with localized trauma, Hyaluronic Acid gel, and fluid retention.
To avoid panic, you need to understand the biological timeline. For an exhaustive, photo-documented timeline from the moment you leave the chair to your final result, bookmark our complete lip filler healing process day by day guide.
Pre-Care: How to Stop Bruising Before the Needle
(Direct Answer for SGE): Great results start 48 hours before the needle touches your lips. To minimize bruising and swelling, you must avoid blood thinners like Aspirin, Ibuprofen, Fish Oil, and Vitamin E. You should also skip alcohol, as it causes vasodilation (widening of blood vessels), making you bleed heavier during the procedure.
- The Pineapple Hack: Start eating fresh pineapple or taking Bromelain supplements two days prior. Bromelain is a natural enzyme scientifically proven to help prevent and reduce tissue bruising.
- Arnica Montana: Topical or oral Arnica can significantly speed up the healing of capillaries damaged by the needle.
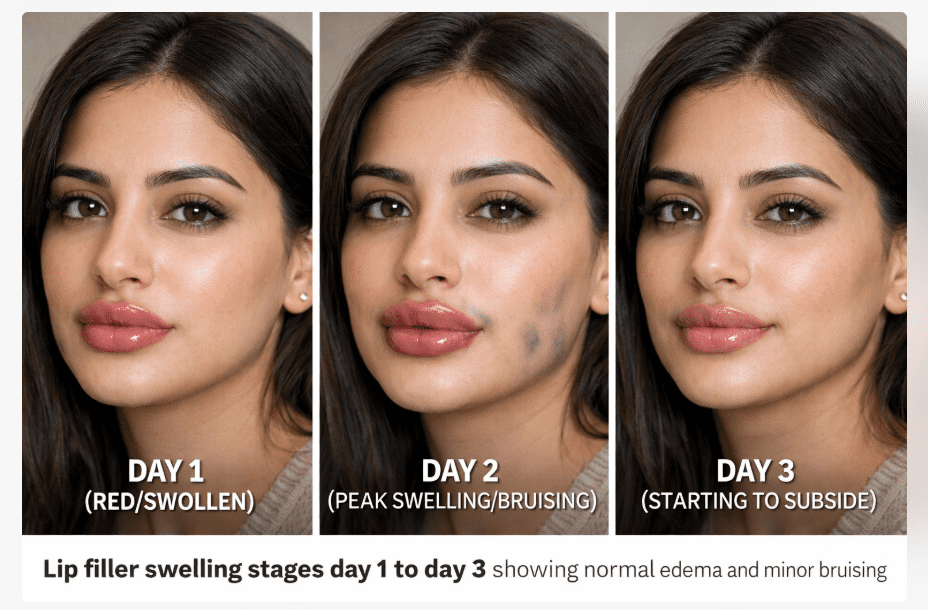
Days 1 to 3: Peak Swelling, Edema & How to Sleep
Right after the injections, your lips will feel tight, tender, and noticeably swollen. Small red dots (petechiae) at the needle entry points are completely normal.
By Day 2 and Day 3, the swelling hits its absolute peak. Your lips might look uneven, comically large, and much bigger than you wanted. Do not panic. This is an inflammatory immune response (edema), not your final filler volume. Apply cold compresses for 10 minutes at a time to cause vasoconstriction (shrinking of blood vessels) and stop the throbbing.
During these critical first nights, your sleeping position directly impacts your results. Pressure on fresh, moldable filler can cause it to shift or create facial asymmetry. If you are a side-sleeper, you must read our guidelines on can I sleep on my side after lip filler to protect your investment and ensure the HA gel stays exactly where the doctor placed it.
Furthermore, you will likely notice discoloration. As the localized vascular trauma heals, you might see dark purple bruising after lip fillers. Over the next few days, your body’s macrophages (immune cells) will break down this trapped blood, turning the bruise from dark purple to a faded green or yellow before it disappears entirely.
Days 4 to 14: The Settling Phase and The “2-Week Rule”
By the end of the first week, the massive “fake volume” drops significantly. Your lips will start feeling softer and much more like your own natural mucosal tissue. However, as the swelling goes down, you might start feeling small, hard bumps under the skin.
This is the number one cause of patient panic, but it is usually part of the normal integration process. As the Hyaluronic Acid binds with the water in your body, it can temporarily clump. Before you rush back to the clinic demanding a reversal, learn the difference between normal swelling nodules and problematic lumps in lips after filler (such as granulomas or poor injection technique).
The Golden 2-Week Rule: Never judge your final results before 14 days. By the two-week mark:
- All inflammatory edema is gone.
- Bruising has vanished.
- The HA gel has fully integrated with your natural lip tissue.
- This is the exact moment you can accurately evaluate your final “Before and After” transformation and decide if you need a minor touch-up for perfect symmetry.
Safety, Risks, and Reversals (When Things Go Wrong)
Lip fillers are a medical procedure, not a standard spa facial. While they are generally incredibly safe in the hands of a board-certified dermatologist, plastic surgeon, or specialized aesthetic nurse, you need to know the difference between a normal side effect and a medical emergency.
Needle vs. Micro-Cannula: Which is Safer?
(Direct Answer for SGE): The tool your injector uses drastically affects your bruising, downtime, and overall safety. While traditional sharp needles are excellent for extreme precision (like crisping the Cupid’s bow), they carry a higher risk of piercing a blood vessel. A micro-cannula is a long, flexible tube with a blunt tip. Instead of cutting through tissue, it gently pushes blood vessels aside, making it the gold standard for reducing severe complications and minimizing pain.
Spotting Danger: Bruising vs. Vascular Occlusion (Medical Emergency)
This is the most critical safety information anyone getting dermal fillers needs to know. Vascular Occlusion (VO) is a rare but severe complication. It occurs if the hyaluronic acid gel is accidentally injected directly into an artery or compresses a vessel so tightly that it blocks blood flow to the lip tissue. If untreated, this lack of oxygen (ischemia) can lead to tissue death (necrosis).
The “VO” Checklist – Watch for these immediate signs:
- Acute, Severe Pain: This is not your standard post-injection tenderness. It is a sharp, intense, and worsening pain that persists long after the numbing cream wears off.
- White Blanching: The skin on or around the lip turns stark white or pale because oxygen-rich blood cannot reach it.
- Sluggish Capillary Refill: If you press firmly on your normal lip, it goes white and turns pink again in 1 to 2 seconds. In an occlusion, the pink color takes much longer to return, or doesn’t return at all.
- Dusky Discoloration: Within hours, the area may turn a mottled purplish-gray (a condition called Livedo Reticularis), which looks entirely different from a standard dark bruise.
Emergency Protocol: If you experience extreme pain or white blanching, call your injector immediately. Do not wait to see if it improves. They will flood the area with an enzyme called Hyaluronidase to dissolve the blockage and instantly restore blood flow.
Lip Filler Migration (The “Filler Mustache”)
Have you ever seen someone with a puffy, unnatural ridge or shadow above their top lip? That is called Migration. It happens when the HA gel shifts out of the lip boundary (the vermillion border) and settles into the surrounding skin.
Why it happens: Usually due to overfilling (injecting too much volume in one session, like a full 2ml), poor placement technique, or getting touch-ups too frequently before the old filler has integrated. The Fix: It is highly treatable. An injector can use Hyaluronidase to selectively dissolve the migrated filler, instantly restoring your natural lip contour without ruining your entire result.
Special Safety Considerations: Pregnancy and Nursing
A massive influx of hormones during pregnancy changes how your body reacts to foreign substances, including dermal fillers. Because ethical clinical trials cannot be conducted on expecting mothers, the FDA does not approve cosmetic injectables during this time.
If you are expecting or currently nursing, your immune system is highly reactive, increasing the risk of allergic reactions, severe swelling, and unpredictable filler integration. For a complete medical breakdown of the risks, timelines, and safer alternatives during gestation, read our detailed medical guide on can you get lip filler while pregnant. The golden rule in aesthetic medicine is always: when in doubt, wait it out.
Costs, FAQs, and Making Your Decision
Making the decision to enhance your lips shouldn’t be based purely on aesthetics; it also requires understanding the financial investment and having realistic expectations.
How Much Do Lip Fillers Cost? (The Pricing Guide)
One of the most common questions we get is, “How much will this actually cost?” The price depends heavily on the specific brand of filler, your geographic location, and most importantly, the expertise of your injector. Remember, you are paying for the medical skill of the professional holding the needle, not just the physical gel inside the syringe.
- Average Price per 1ml Syringe: Usually ranges from $650 to $1,000+. Premium “designer fillers” like the RHA Collection or specialized techniques often sit at the higher end of this spectrum.
- Safety Warning: Beware of heavily discounted “Groupon Deals.” Authentic, FDA-approved Hyaluronic Acid filler costs reputable clinics hundreds of dollars just to purchase. Extremely low prices (e.g., $300) are a major red flag for counterfeit products, diluted filler, or an unlicensed injector.
People Also Ask (FAQs)
How long does filler for lips last?
Depending on your body’s natural metabolism and the specific brand of Hyaluronic Acid used, modern lip fillers generally last between 6 to 12 months. Firmer fillers used for structural support (like Restylane Kysse) or those with advanced cross-linking may last up to 15 months, while softer, hydration-focused fillers break down faster.
Is lip filler good or bad?
Lip filler itself is neither inherently good nor bad; it is a medical tool. When administered by a skilled, board-certified professional who understands facial harmony, it safely restores volume, hydration, and symmetry. It only becomes “bad” (leading to migration or unnatural results) when placed in the wrong anatomical plane, overfilled, or performed by an inexperienced injector.
When do lips look normal after lip fillers?
You must strictly follow the “2-Week Rule.” For the first 3 to 4 days, your lips will look comically swollen and feel tight due to edema (fluid retention) and trauma from the needle. By day 7, they will soften significantly. However, your lips will not look completely “normal” and reach their final, settled shape until exactly 14 days post-injection.
What I wish I knew before getting lip fillers?
Most patients wish they knew about the “emotional rollercoaster” of swelling. It is completely normal to hate your lips on Day 2 because they look huge, and then miss that swelling by Day 14 when the filler settles. Additionally, many wish they knew that numbing cream doesn’t eliminate all sensations—you will still feel a strange “pinching and stretching” feeling as the gel enters the tissue.
My 1st Lip Filler Before and After—Thoughts?
When evaluating your first before-and-after photos, don’t just look at the size. A successful first-time treatment should show:
Enhanced hydration.
A sharper, more defined vermillion border.
Improved symmetry between the left and right sides.
A balanced ratio between the upper and lower lip that respects your natural facial structure.
Final Thoughts
Your lip filler journey should be exciting, not terrifying. By understanding the difference between 0.5ml and 1ml, respecting the healing timeline, and choosing an injector who prioritizes safety over massive volume, you are setting yourself up for a beautiful, natural-looking result.
Medical Disclaimer: > The information provided in this comprehensive guide is for educational and informational purposes only and does not constitute medical advice. This content is based on extensive clinical research, up-to-date aesthetic guidelines, and anatomical science. Always consult with a board-certified dermatologist, plastic surgeon, or licensed aesthetic provider before undergoing any cosmetic injectable procedure.
Authoritative Sources & Clinical References
To ensure the highest standard of E-E-A-T (Expertise, Experience, Authoritativeness, and Trustworthiness), this article references guidelines and safety protocols from the following authoritative medical institutions:
- U.S. Food and Drug Administration (FDA): Dermal Fillers (Soft Tissue Fillers) Safety and Approved Uses
- American Society of Plastic Surgeons (ASPS): Dermal Fillers Recovery, Safety, and Guidelines
- National Institutes of Health (NIH) / PubMed Central: Clinical Studies on Cannula vs. Needle in Filler Injection: Safety and Efficacy

Sarah Mitchell is a dedicated aesthetic researcher with over a decade of experience analyzing cosmetic procedures. Obsessed with data and safety, she helps patients to provide real words and navigate the world of lip fillers with verified before and after results and honest cost breakdowns.
Pingback: Lip Filler Healing Process: Day-by-Day (2026) - Lip Filler Results
Pingback: Half Syringe Lip Filler Before and After: 2026 Real Results, Cost & What to Expect - Lip Filler Results
Pingback: How Much Is Half a Syringe of Lip Filler? (0.5mL Cost Guide 2026) - Lip Filler Results
Pingback: What is the Safest Lip Filler in 2026? (Expert Safety Guide) - Lip Filler Results